MacrossJunkie
-
Posts
3234 -
Joined
-
Last visited
Content Type
Profiles
Forums
Events
Gallery
Everything posted by MacrossJunkie
-
Where does the gunpod store in fighter mode on this thing, btw? I'm looking at the underside and the area you would normally expect it to attach is entirely made up of the missile box, so it seems like the gunpod would be either attached much more forward or somewhere on the side. If there was ever a valk that looked back heavy and seemed like it would have a hard time standing, it would have either been the VF-25 with full armour or the VF-4. Neither of those have any issues standing up. The wings and missile launcher box on this thing look comparatively light so I think there won't be any balance problems at all.
-
Well, we knew it was inevitable. I kinda prefer my 25's without, though. The super packs are my least liked add-ons for the 25. I just wish they would announce some tornado packs for the 25F and G already.
-
Yes! Awesome. Looking forward to it. I love the fighter mode.
-
 I'm glad you like it. I'd hate for my pics to influence you to get it and you end up hating it I'm not sure if this is what you're looking for, but little pieces can be pulled out of the back plate and kinda tab into the vertical stabilizers to keep them in place. I don't have a better pic of it, but you can see it here. You'll know it when you go back and look at it on your copy.
 -
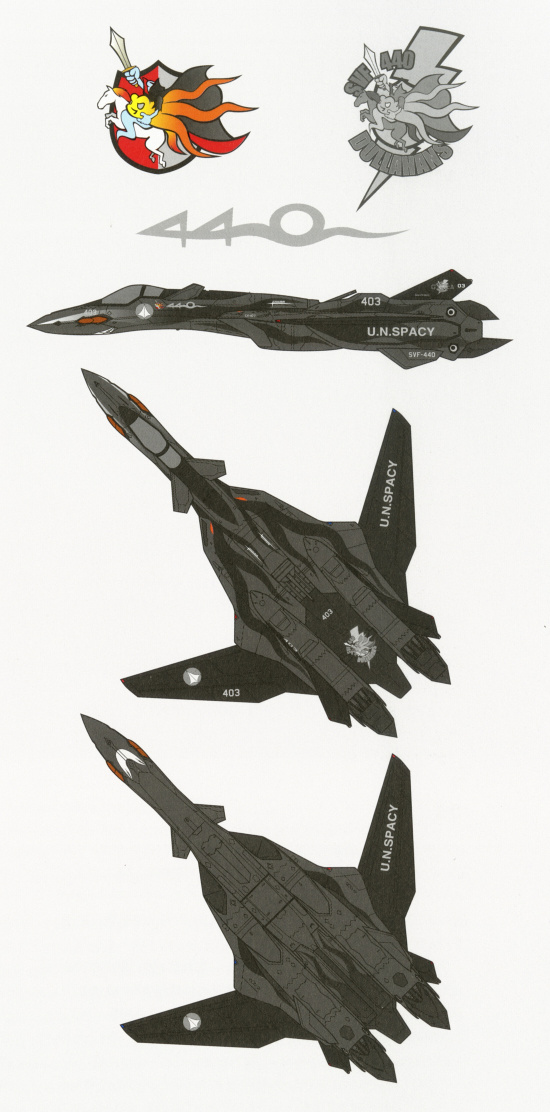
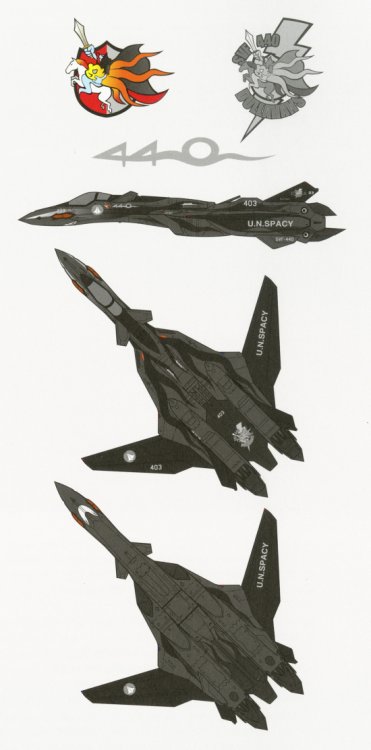
While unlikely, I'm hoping they consider this paint scheme from Operation Phantom Sword or one of the two low-vis schemes here:
-
That would be pretty awesome. Based on the illustrations on page 43 of the master file, the head unit looks pretty nice also. Especially compared to the clown-faced kai.
-
You can wedge a small flat headed precision screwdriver in there or the edge of an xacto knife.
-
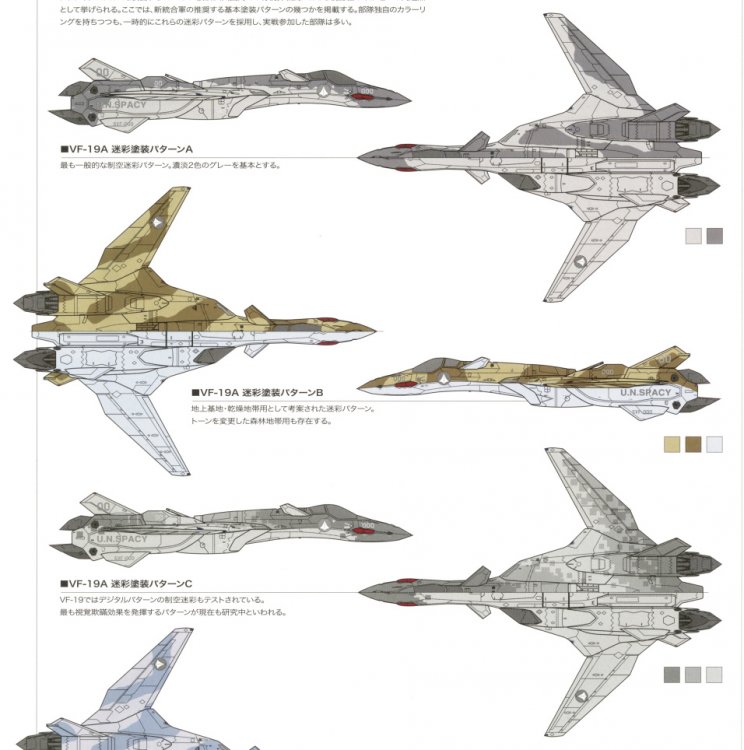
That's definitely some promising news. Perhaps the Ravens scheme or some of the ones in the Master File? A good number of the ones shown in it were for the 19A.
-
Yup, that's exactly it. I wish I knew exactly how to do that. From taking apart portions of my Alto to shave off some plastic around some joints sometime ago, I know you can separate the chest piece from the LERX by taking out the screws underneath the chest and keep going at it from there. However the other end is the tricky looking part. The LERX is inserted into and rotates within a metal tube. I'm not sure if you can just pull the LERX straight out, but it kinda looks like it is locked in with a pin or some other mechanism. I didn't examine it too closely as it just seemed like a lot of work. I would have tried to remove the piece that angles out and locks for the crotch portion, but there are screws that are hard to reach underneath the cockpit area when you pull that piece out. Seemed like you'd need a special screwdriver or try to unscrew from a very diagonal angle.
-
The only things I took off were the thruster rings on the feet and the hip guns which were sprayed individually. Everything else is easily reachable. I spray it in part GERWALK, part battroid mode. The head is popped out, wings fully extended, arms out, legs brought down (not using the GERWALK joint) straight with the crotch piece perpendicular to the rest of the plane. The only thing that has to be sprayed later is the center portion of the chest piece. I only masked the areas that should remain glossy/clear and I avoided spraying the feet entirely so they stayed glossy too. The little red dot on the center of the chest was masked using liquid masking tape, everything else was tamiya masking tape. After removing the tape from the canopy, I used a fine tipped brush to apply the semi-gloss finish to the canopy frame since that was covered by the masking as well. I haven't had any issues with the clear coat getting between spaces and causing problems. Perhaps it might if it was brushed on, but with an airbrush, there hasn't ever been an issue.
-
Thanks. After I painted the stripes, I did the panel lining with a light gray oil wash. Afterwards, I cut and placed the stickers and tried to level them a bit by spraying multiple clear coats in localized areas first. I airbrushed the weathering and then did a full gloss coat. Then I brushed on some highlights with the Tamiya weathering kit and also used it to blend and lighten portions of the panels. I sealed that in with another coat and then masked off all the clear and shiny areas like the canopy, sensors on the nose, the lenses on the head unit and the wing lights. I then sprayed with a semi-gloss coat using a mixture of Future and Vallejo matte varnish. Actually, it's a dark olive drab-ish color, but thanks! I tried to make it close to how the CFs appeared in a bunch of scenes from the series. Although they sometimes appeared without the stripes also, I prefer it with. I shaved off a little plastic from the inner sides of the LERX using a xacto knife to give it more clearance. There is still some scraping near the rotational point which I couldn't get to, but it's not visible in battroid, GERWALK, nor fighter mode. It would probably be easier to sand down the parts of the fuselage that the LERX comes in contact with, but I had already painted and didn't want to do the masking all over again.
-
Those are all such fantastic customs. You have quite a unique VF-1 collection to be proud of. I wish Arcadia would make some of those or at least sell some decals and more of those blank VF-1 kits.
-
1/48+fp's, 1/60+fp's, 1/72, 1/2k, 1/3k,1/100 and now 1/144
MacrossJunkie replied to VF-18S Hornet's topic in Toys
Alto and Michael sortie with backup - More of the VF-25A here: http://www.macrossworld.com/mwf/index.php?showtopic=36536&p=1081187 -
I finished with my 25A. Since pics of the Hasegawa 25's had surfaced, I used them as a guide for some extra sticker placement using leftover Yamato stickers. As usual, full sized versions if you click a pic. Fighter: GERWALK: Battroid:
-
I did notice that the wings were noticeably flatter on this release.
-
The VF-25's have been for the most part problem free. The RVF-25 which came after the CF VF-171 was also just fine. The problems with the 171 seem to be specific to the CF version. If they released another 171, I'd still be wary and avoid pre-ordering it and just wait to see what other people say since I'm not risking getting another 171 with self destructing/missing parts.
-
1/48+fp's, 1/60+fp's, 1/72, 1/2k, 1/3k,1/100 and now 1/144
MacrossJunkie replied to VF-18S Hornet's topic in Toys
lancalot, Are you using the metal rods that slide out to help hold up the outer sections of the wings? I lucked out with my Ivanov and it holds up even without the rods, but they help on my Nora. Also in battroid mode, you can lift the shoulder pauldrons and bring them closer in like so: I think it noticeably improves the look of battroid mode. -
Wow. That looks so good. I love the city section you made. That smashed concrete under the feet is a very nice touch too.
-
Yes! I would especially love the VF-19 ACTIVE Nothung, YF-25 Paladin, and that custom VF-0 which I can't remember the name for right now.
-
I don't think so. The black NUNS part just snaps on over the shoulder joint via two round bumps on the diecast part. The screw wouldn't relieve the pressure being put on the plastic presumably by the round bumps.
-
I'm afraid to even touch my one good one which is in battroid mode currently. Or at least it was good the last time I handled it. Right now, I call it Shrodinger's shoulders. It was good during several transformations before leaving it in battroid, but it could have cracked on its own. I can't really tell because it's hidden by the pauldron. It's in a state of being broken and unbroken at the same time and only by moving the pauldron out of the way in a transformation to observe it will it collapse into one state or the other. Yup, that's the exact same thing that happened to my first one in pretty much the same spot. You can even see the white stress mark on the side. Mine eventually just cracked and split apart. This was taken before it broke. If you zoom in, you can see the same deformation in my pic as well. If you remove the shoulder piece and look on the inside, you'll likely see it has cracked and split apart on the inside.
-
I don't like the VA-3 either, but I'd buy one as well just to add to the variety of my collection. For that same reason, I'd also buy a VF-9, VF-14, VF-5000, any of the Varauta fighters or even the Feios. The only things I wouldn't buy are the Sound Force valks. My desire for variety and having all variants can't overcome my disdain for those things...
-
It scraped off both the Future coat and paint. I wasn't really sure how it comes apart to so I tried the next best thing. I moved the LERX around at different angles and used an xacto knife to shave off plastic a little bit at a time to create more clearance. It seems to have helped. There's still some paint scrape, but it's in an area not normally visible. An alternate method would be to sand down the parts of the fuselage that come in contact with the LERX. I would have done that if I were not lazy and didn't want to have to strip the paint off and do the masking all over again.
-
A word of caution to anyone else who wants to try what I did - I performed a test transformation and to my dismay, the inner sides of the LERX does cause paint scrape in visible areas to the painted area of the fuselage when it swivels. I shaved down the sides of the LERX a little and repainted. Hopefully I shaved off enough. I'm letting the paint dry before I try again.
-
Thanks, I already finished up the panel lining last night after I painted the stripes. I'll probably get around to the weathering part over the weekend. I sprayed it as shown in my first pic with all the masking tape. I could have sprayed it with the LERX angled perpendicular to the fuselage, but in the end it doesn't really matter because you only see the unpainted section in the process of transformation, but is hidden in any of the three modes. You don't really need to take the LERX off unless really being really OCD about painting areas that will never see the light of day. Just angle them upwards and you'll be able to get at the visible sections.