-
Posts
2060 -
Joined
-
Last visited
Content Type
Profiles
Forums
Events
Gallery
Everything posted by Anasazi37
-
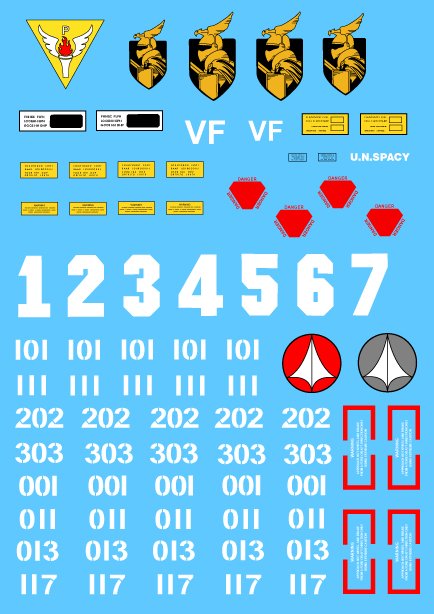
Okay, here's the final layout for the 1/60 GBP sticker/decal set. I managed to squeeze in a few of the designs from the ARII kit. The "Next Objective" girl doesn't look very good, though. I even tried using the one that comes with the 1/55 Takatoku, but that one also looks bad. Twin Moons should have the decal version of the set up for preorder very soon. If you want the sticker version and/or have a custom request for the set, please PM me.
-
Perfect! Thanks, Neova! This should do nicely. I'll try to incorporate a few more decals from this sheet. The "Next Objective" girl doesn't look too good, though. I'll see if I can find a better one. More soon....
-
You mean this "valk girl"? It comes from the Hasegawa Minmay Guard Strike kit (aka MG 2). I could easily resize it to fit on the GBP leg armor, but I am not sure everyone would want it. How about this: Those who are interested in decals for their GBP beyond those in the sample pic, please PM me and I can add them to your set if you're willing to kick in an extra $1 or so (depending on how many you want).
-
If it's still MISB, then please don't open it up on account of this project. I'd hate for you to ruin a mint kit just so I can put a few more decals on a sheet....
-
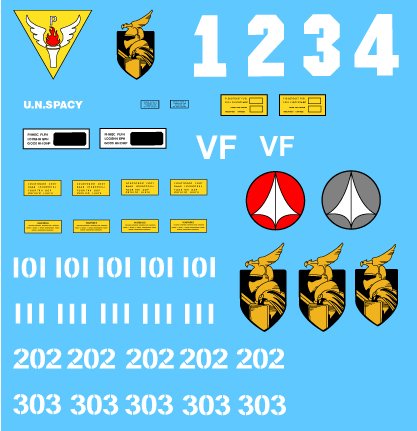
Your guess is as good as mine on the torch insignia. I haven't found it anywhere else. The Prometheus angle, referencing the Greek mythology, could fit. The knight insignia comes from the old Macross Hobby Handbook and it doesn't reference a particular squad or fleet. The Handbook has it associated with "Armored VF-1" and nothing more. I guess it's a general designation. And it looks cool. Oddly enough, on the page of the Handbook with the knight insignia is GBP spelled out: Grenade Box Protector. I never noticed that before. So much for the debate on that acronym...
-
Unfortunately I don't have that kit, I got that image off Macrossworld's model section. Can anyone help? Those little extras would be a great addition to spruce up the 1/60 GBP. There is one thing that could be quickly added, however, without much effort. See attached picture for the circled item. You know, I've always wondered about that particular kite symbol. I think it's the only example of one where the red and white are reversed. I've never been a big fan of it, but it does show up on the box art for both the ARII kit and the Takatoku 1/55 armor set.... I'll try to get that one added later today.
-
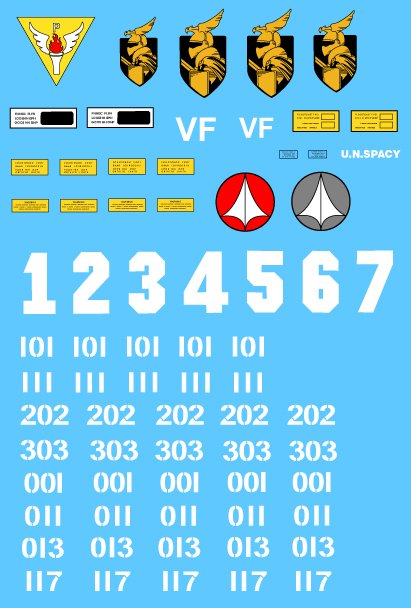
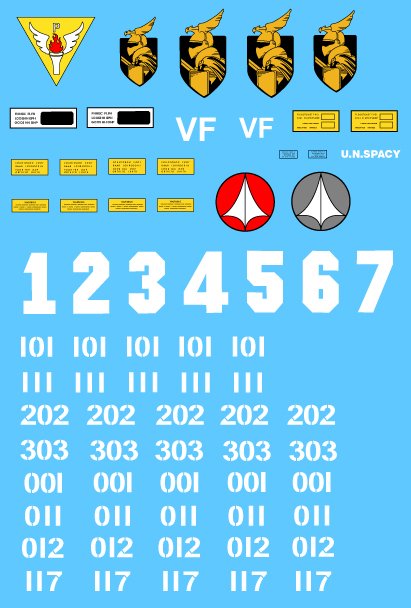
Whoops. My mistake. I guess the coffee hadn't kicked in yet when I was working on the set this morning. The 012 has been changed to 013. Thanks for the heads up.
-
Okay, I've added more numbers to the set. I read through the "GBP Numbers" thread and it looks like 1-7 should take care of all known variants for the chestplate. I had to "scratch build" 5-7 based on how 1-4 were designed. I think they fit in with the theme pretty well. As for individual valk numbers, I added 001, 011, 013, and 117 (standard CF). Whew!
-
If someone can get me a good scan of the original decal sheet, I might be able to add those--if it's just the ones you circled. I'm trying to keep the sheet fairly simple and affordable, though, so I don't want it getting too big. I just spoke with Tamim over at Twin Moons and they will be carrying this set. Price has yet to be determined, but I think around $5 is a pretty good estimate. They should have the sets available in a few weeks. I have to squeeze in production between a ton of other projects....
-
Okay, looks like people want more numbers. I'll see what I can do.
-
They can be printed as either waterslide decals or standard stickers.
-
I just got my 1/60 GBP set from Twin Moons a few weeks ago and finally had some time to sit down and create a set of decals/stickers for it. They are essentially repros of the original sticker sheet, but they are by no means straight copies. I redrew each one, in many cases improving on the originals. I also threw in the Armored Valkyrie badging from the old Macross Hobby Handbook. I really like the design. There are enough of them so you can put one on each tailfin, the heatshield, and the nosecone section of the GBP armor (instead of the winged-torch-triangle thing). Price should be around $5, but I won't know for sure until I talk to Tamim over at Twin Moons. In the interim, let me know what you think.
-
I make both waterslide decals AND stickers, so you're in luck.
-
Anasazi37 Will you be producing extra numbers for the chest, leg, and arm piece for customization? I hadn't thought of that. I was planning on doing a straight repro sheet, but I can add some extra numbers no problem.
-
I'm working on them right now. It's long overdue, I know. I figure I might as well make them while I'm creating a set for the 1/60. I need a better scan of an original sticker sheet, though. The one I have isn't very good (150 dpi). I need a full color scan at 600 dpi or better.
-
Oh, you want it in 1/48. I didn't realize that. Sure, I can help you. I'll add your project to the queue and PM you when I get closer to being able to start it.
-
The scan of the sponsors I have is from the Macross Option Decal #2 set, where they appear in dark purple. I know that there are a few other Option sets floating around out there, including the Minmay Guard one, and one of them might have the 2500th valkyrie logo. If so, you might be able to track one down, Firefox. I'd suggest posting something in the Wanted forum, but let me know if you don't find what you need.
-
Piece of cake. I already have the company logos scanned in at high res from another decal sheet. The valkyrie logo will take some work, but it shouldn't be too bad. The only hurdle is *when* I'll have the time to do it. I have quite the backlog of projects. My best guesstimate is at least a month or two.
-
While I could make decals for the entire valk, it would look MUCH better if the major work was done with masking and airbrushing. In my experience, covering large areas with decals generally does not work very well. I believe DOM made a 1/60 version a few years ago that sold for quite a bit on eBay. It was a real work of art. I could make all of the detailing decals no problem (if I have good enough scans of the originals), but there's a hefty waiting list for custom projects. Right now it's about six months....
-
Here are some pics of my setup. Please excuse the mess--I haven't had time to clean up the booth since I finished my last custom project.
-
I just recently built a spray booth in my garage. I needed more space than the ones you can get commercially. It's 28" wide by 24" high by 18" deep. The fan unit is a kitchen range hood with variable speed. And there really is nothing to worry about when it comes to sparks and whatnot. Keep in mind that these fans are safety rated to vent fumes over an area where you are cooking. This includes flammable oils, etc. I haven't had any problems so far and I do not anticipate any. I went all out on this setup. I built a frame out of plywood and 2x4's and made the three large side and back panels removeable for easy cleaning. Each of these panels is covered in linoleum so I can use strong cleaners to get rid of built-up paint. The range hood is attached to the frame at four points which can be easily unfastened. I screwed in two shoulder hooks on the outside of the booth to hold my airbrush when not in use. I installed lighting high within the booth, too. Man does that make a difference when you're painting! To vent the fumes outside, I atttached a dryer hose to the range hood, one of those slinky flexible ones. When I need to paint, I open the garage door a few inches, shove the hose outside, and I'm ready to go. When done, I collapse the hose and leave it on top of the range. I built this booth anticipating that I would be moving to an apartment next year. Turns out I won't have to move, but this setup should work for anyone who's in that situation. It wasn't that difficult to make, but I had access to a professional woodshop. As a result, some of the features I incorporate might not be as readily available to you. All told, I spent less than $200. I'll try to take some pictures of it later today, if anyone's interested.
-

Good Paint brands for painting 1/60, 1/48, 1/55
Anasazi37 replied to RichterX's topic in The Workshop!
You should lay down a coat of primer first. Most spray can primers you can get from places like Lowe's or Home Depot will work just fine. The primer really grabs onto the plastic or metal and then the paint grabs onto the primer. It cuts down on flaking, scratching, etc. Acylics tend to not be as durable as enamels, but they are a heck of a lot easier (and safer) to use and clean up. Tamiya acrylics are much better than Testors. Before applying decals, you'll need to seal in the paint job with a glossy clearcoat. Airbrushing Future Floor Polish works well. If you're not skilled with an airbrush, the next best option is a spray can of Krylon Crystal Clear. Once this dries, apply decals as needed. Then apply another clearcoat to protect them. For aircraft and mecha in general, a satin or flat finish usually looks more realistic. A spray can of Krylon Satin will do. If you have an airbrush, I'd recommend something like Microscale Micro Flat. -
That's how the armor looks on the Hasegawa Minmay Guard battroid kit. The nosecone and chestplate intakes are also yellow on that version. Why the original artist decided on yellow is beyond me, but it looks good with the grey, white, and purple.
-
Thanks, Graham! I posted way too many pictures, though--more than you'd probably want to put on the custom toy page. I'll PM you with a list of links to the best ones later today.
-
They are officially done now. I printed out a set and they look really good. Gene commissioned the decals for a custom Kurt is making for him. I don't know about their general availability yet, but will keep everyone posted as I know more. Just a quick heads up to everyone: I'll most likely be taking orders for decal and sticker sets next week, so start thinking about what you want to purchase. The order window, as usual, will be one week.

